If you think about how you move in everyday life, lots of it is on one leg—whether you realize it or not. Jogging to make your bus, stepping into your car, or putting on your pants all require single-leg strength and stability. But when you’re at the gym, so many exercises (think: sumo squats, Romanian deadlifts, even box jumps) have you working bilaterally. There’s nothing wrong with these moves, but they might not be working your muscles as functionally as they could be.
That’s where B-stance exercises come in. Sometimes called kickstand or split stance, B-stance puts most of the weight into one foot, making it a more accessible way to train than a completely single-leg stance—which can be pretty daunting, since one leg is doing all the work—while still bringing the same benefits. This can be a smart way to build up the strength of each individual leg. It’s what helps gymnasts like Suni Lee, say, pull off mind-boggling jumps, turns, and twists on a balance beam, sure, but it also helps us mere mortals do things like climb stairs or simply lift more weight when we deadlift.
Yet too many of us overlook this option. “If you’re not thinking about, ‘I need to create balance within my body,’ you’re probably not going to say, ‘I need to infuse [this kind of] work into my routine,’” Teddy Savage, CPT, national lead trainer for Planet Fitness, tells SELF. “But you absolutely should.” Here’s why.
Wait, what exactly does B-stance mean?
In a B-stance position, one leg takes on about 80% of the work, while the other is placed next to it lightly, taking on the remaining 20% or so mainly for balance and stability, Savage says. To get into position, you simply step one foot slightly back with your toe planted and heel lifted, placing your toes roughly in line with your opposite heel. (If you need to place your toes a little further back to make the position more comfortable, just be sure to keep your hips aligned and your back leg bent.) Savage recommends thinking of your legs on a two-lane road; your legs should remain hip-distance apart so they stay in their own lanes even though one is further back. The leg of the foot that remains planted is doing most of the work; the other—the one with your heel up—only takes on a little.
You can think of that back leg like “a kickstand for a bicycle,” New York–based trainer Kristie Larson, CSCS, tells SELF. “We’re not supporting the full weight of the bicycle on the kickstand, but it is helping make sure that we don’t tip over.”
Some of the most common exercises where you’ll see people rocking B-stance are squats, Romanian deadlifts, and hip thrusts—really “any type of a hinging movement,” Savage says. (In the case of a hip thrust, instead of bringing the toe back on your kickstand leg, you place that heel forward, roughly in line with the toe of the foot of the leg you’re working.)
What are the benefits of B-stance exercises?
So what’s the point of getting into this middle ground between training on two feet and one? “It’s a way to start moving toward unilateral exercise or to help address imbalances side-to-side with less of a balance demand than doing something fully on a single leg,” Larson says.
Most of us naturally have one side of our bodies that’s stronger. So when we do exercises that use both arms or both legs at the same time, like in a traditional squat or push-up, that stronger side inevitably takes over, at least a little. By working one leg at a time, we can make sure we’re challenging each side equally. This can keep us from developing muscular imbalances between our dominant and nondominant sides that could lead to “stresses and strains and injury,” Savage says. For instance, if you tend to favor your stronger leg while you cycle, this could lead to hip pain because you’ll be pushing and pulling harder with one side.
Yet diving right into single-legged exercises can be tough; the balance you need is legit. Sometimes you end up wobbling around so much it’s hard to actually finish a full set. With B-stance, that kickstand leg gives you the support you might need to actually pull off the move—and with better form. “I like that they can help me practice pelvic stability as I move because I am rooted and grounded through my other foot,” says Larson, who’s been using B-stance deadlifts as part of both her clients’ and her own strength programs recently. “It gives me more feedback so that I can be better aware of how my pelvis is positioned.”
But even folks who have mastered the balance of unilateral exercises still can get other perks from the B-stance: Larson adds that giving yourself a kickstand can also help you lift more weight; with most of the balance issue taken out of the equation, your muscles can focus more on the work at hand. “I like that I can use a heavier load than I could if I was just doing a single-leg exercise,” Larson says.
Also, if you have tight hips, this shift in position can help open up your range of motion in the joint, according to Savage. “It’s a really good exercise for hip mobility and to fire off the stabilizers that help to support the joint, whether it be ankle, knee, or hip,” he adds.
How should I use B-stance in my workouts?
Because B-stance exercises get each side fired up independently, both Larson and Savage particularly recommend them for runners or anyone who does an activity where they’re spending lots of time on one leg, like pickleball or soccer. They’re also a great option for people with balance issues. “You can still get a lot of the benefits of doing single-leg exercise without that fear of, Oh, I’m going to fall over,” Larson says. (Although if you’re really worried about your balance, she recommends using one weight only and holding onto something stable for support with your other hand since B-stance work will still challenge your stability.)
For B-stance beginners, Savage recommends trying this position without any weights to get a sense of how it feels. Once you’ve built up your strength and mobility, and feel comfortable with the footing, then you can load it up with dumbbells or a barbell.
Just remember that because you’ve got both sides to cover, you might want to stick to fewer reps so you don’t have endlessly long sets that could overtire your upper-body muscles that are working with every rep, no matter which side you’re working. “It might be unreasonable for you to do 12 on each side because then you’re looking at a set of 24,” Larson says. “And depending on how heavy you’re lifting, that just might be a ridiculously long set for you to try to accomplish.” Alternatively, you could lighten the load or take a short break between sides to make it more doable (if you’ve got the time).
Savage recommends working B-stance into your workout program as a conduit between two-legged and one-legged work over the course of a training block. “What I would suggest is starting with your two-leg variations of the movement, maybe over four weeks,” he says. “And then for the next two weeks, you can go into the B-stance variation. Then you can progress to another four weeks of trying to do your single-leg movements, and even start to add more plyometrics to those movements as well.”
If you commit to using B-stance strategically and consistently, Savage says you’ll start to see your less-dominant side step up, and that can change how you feel when you move—both at the gym and in daily life. “The first thing you’re going to feel is the improvement of confidence,” he says.
Here are some B-stance exercises to try:
1. Kickstand Deadlift
Katie Thompson
- Stand with your feet hip-width apart, holding a dumbbell in each hand.
- Step back with one leg, planting your toe on the floor and your heel up, so your stance is staggered. Your toe of one leg should be nearly in line with the heel of your other. You’ll be working your front leg.
- Hinge at your hips to lower your body. Push your butt far back and keep your back flat. Your torso should be almost parallel to the floor.
- Keeping your core tight, push through your front heel to stand up straight. Keep the weights close to your shins as you pull up.
- Pause at the top and squeeze your butt. That’s 1 rep.
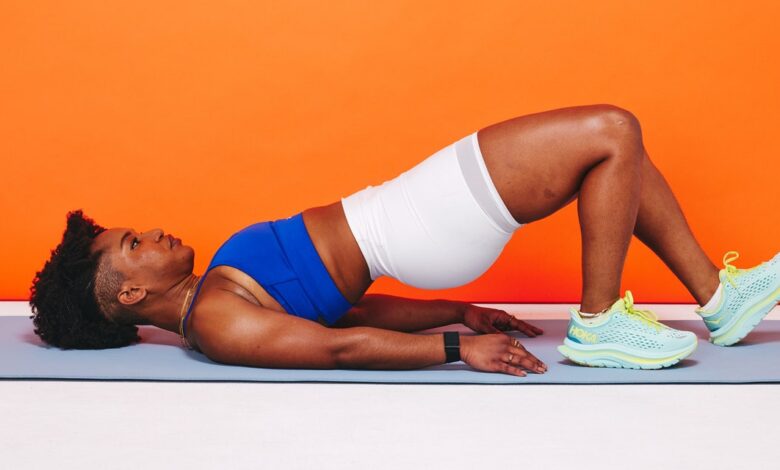
2. Kickstand Glute Bridge
Katie Thompson
- Lie face up with your knees bent, feet flat on the floor, and heels a few inches away from your butt so that your fingertips graze your heels when arms are at your sides.
- Straighten your one leg slightly to bring your one heel in front of the other, toes point up. The heel of that foot should be slightly in front of the toes of your other.
- Squeeze your glutes and abs and push through your heels to lift your hips off the floor until your body forms a straight line from your shoulders to your knees
- Pause and squeeze your glutes at the top, then slowly lower your hips to return to the starting position.
Demoing the moves above are Gail Barranda Rivas (GIF 1), a certified group fitness instructor, functional strength coach, Pilates and yoga instructor, and domestic and international fitness presenter; and Alicia Jamison (GIF 2), senior coach at Body Space Fitness and adjunct lecturer at Brooklyn College.
Related:
- What the Hell Is a ‘Butt Wink’—And Is It Really All That Bad?
- 12 Benefits of Strength Training That Go Beyond Building Muscle
- Does Yoga ‘Count’ as Strength Training? Cardio? Both?
Get more of SELF’s great fitness coverage delivered right to your inbox—for free.